Autumn Leaves
Goose Eggs

Autumn Leaves
Goose Eggs
In the autumn of 2010 I decided it might be nice to create a few autumnal pysanky on goose eggs. Although the maple leaf designs I had been making were nice, autumn leaves (at least in Michigan) can be quite colorful, and I wanted to capture this on an egg.
I had noticed that one of my co-workers, Margaret, had a jacket with a really nice design on it–autumn leaves in red, orange, brown and yellow swirling together on a black background. There were oaks, maples, ashes and poplars depicted. It was a gorgeous design, and she was kind enough to xerox her jacket for me. I took it home and used it as the basis for an autumnal egg.
The goose eggs below are the result. (Note: the rest of the discussion here is about technique. If you just want to look at the pictures, scroll down now.)
The first attempt didn't turn out quite like I wanted. I placed leaves loosely on the background, outlined in white, wiped the pencil lines off with a Goof-Off wipe, and dyed and waxed in the leaves:
UGS1 yellow: beech leaves
UGS pumpkin: ash leaves
UGS red mix2: maple leaves
brown: oak leaves.
The brown, which I got by dipping the red egg into a jar of old, weak black dye, turned out a quite a bit darker than I'd planned. Rather than using black as a final color (against which the oak leaves would barely be visible), I washed the brown off and dipped the egg into light blue, as I often do with floral and snowflake eggs. I thought it might look nice, sort of like leaves falling through a clear blue sky. It wasn't bad, but not quite what I had in mind, and I thought that the oak leaves didn't seem quite right.
For the second egg, I used templates to draw ovals and circles on the egg to help with placement of the oak and maple leaves–I wanted more leaves on the egg, and closer together. And I figured out how to draw the oaks properly, making the tips more pointy, like pink oaks or red oaks. I was less successful with the maple leaves, making them too pointy, and they ended up looking a bit like holly leaves.
The color sequence was
EC3 gold: beech leaves
spot dye UGS light green: ash leaves
very vivid orange: ash leaves
UGS red mix: maple leaves
brown: oak leaves.
The very vivid orange color was obtained with a very quick dip (in and out) of the gold egg into EC pink. The brown was UGS brick followed by a short dip into the old black dye.
While I liked this layout better, the colors seemed a bit too garish, like a bag of Skittles. I suspect the egg may have turned out much nicer if the colors had been a bit more muted, and if I’d used pumpkin instead of the orange that I did, and used two different reds on the maple leaves (as I did on the next egg).
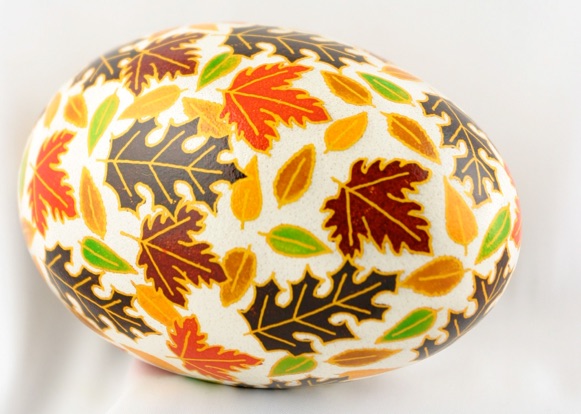
I had thought, from the start, that this “Autumn Leaves” design might look good on a white pysanka, and decided to actually make one with the third goose egg. I drew out the circles and ovals on the white egg, and then dyed the egg EC gold. I wrote in all the outlines on gold, and then wiped the egg down with a Goof-Off wipe to remove the excess pencil. Some of the gold came off, too, but I just dipped the egg back into vinegar rinse and then the EC gold. The rest of the color sequence was
spot dye UGS brick: ash leaves (half)
spot dye UGS light green: ash leaves (half)
UGS pumpkin: beech leaves
UGS red mix: maple leaves (half)
UGS red: maple leaves (half)
brown: oak leaves.
UGS red gives a deep red color, when left in a bit. I dyed the egg in the old black dye to get a deep brown for the oak leaves, which look good against a light background.
There are many ways of removing the color to get an egg back to white; on goose eggs (which take dye quite strongly) I find I have the most luck by dipping the egg first into a bleach solution, rinsing it well, and then rubbing a bit with a Magic Eraser to remove recalcitrant spots. I finish by washing the egg with Ivory soap to get rid of the slippery feel one gets from bleach. Soaking the egg in Simple Green works well, too, but requires a bit of elbow grease, as the egg needs a good scrubbing afterwards.
Removing the wax from white pysanky is more difficult that from those with dark backgrounds. Once the egg was nice and dry, I coated it with olive oil, and removed the wax with a candle. The olive oil keeps the white areas whiter, I have found.
This third variant was my definitely my favorite, and I made three more such pysanky in 2010 as gifts (including to my good friend Beth, who supplied me with some of the nicer goose eggs this year from her farm co-op).
__________
1.UGS: Ukrainian Gift Shop dyes
2.“Red Mix” is my favorite red combination, and it gives pysanky a deep (but not dark), rich red color. It is made by mixing together one packet each of UGS Scarlet and UGS Red. Scarlet, by itself, is a bit orangey, and Red is a very dark red, especially if an egg is dyed in it for an any period of time. It is a combination my Ukrainian friends came up with to duplicate the deep, full reds one finds on traditional pysanky.
When using the red mix, DO NOT leave the egg in for more than a few minutes, or you will end up with the dark red color of UGS Red.
3.EC: EggCessories dyes