Setting Up:
Student Work Space
Setting Up:
Student Work Space

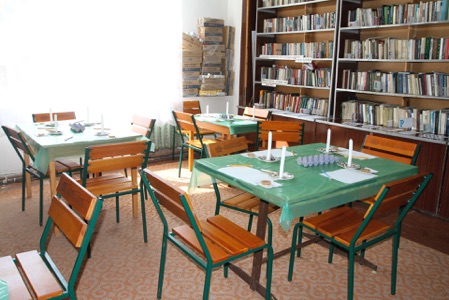
The work area should be set up for the maximal convenience, comfort and safety of the participants. The area should be well lit, and the work table sturdy and still (not wobbly). There should be no drafts. Chairs should be comfortable and stable. There should be plenty of elbow room, so that students don’t knock into each other, or knock over each other’s candles or eggs. Small tables are best, as in the photo below, but this is not always possible. Whether using small or long tables, give each participant plenty of space–don’t crowd the chairs together if you can avoid it!
The work table, as noted before, should be solid and non-wobbly. It should be covered; this can minimally be a layer of newspaper (C) to protect it from spills of wax and dye, as well as broken eggs. At the end of a session, the newspaper is cleared away and thrown out/recycled. In recent years, at least in my large group settings, I have begun using plastic tablecloths on the tables. They are easier to put in place on large tables, protect the tables well, won’t catch on fire (always an important consideration when working with children), and are reusable. After a few sessions, the tablecloth may not look pretty, but it still functions properly.
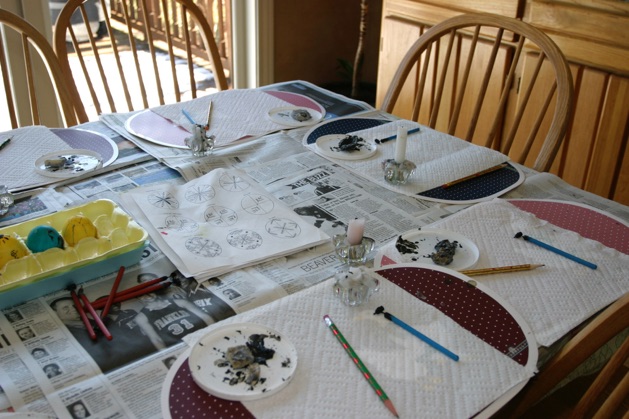
I try to have everything set up before the students arrive, including setting out all the supplies (eggs and matches excepted) for each student in advance. Eggs have a tendency to roll and/or break, and young boys in particular seem to have a deep-seated need to light and play with candles and matches. I pass out eggs only after the didactic part of the class is finished, and it is time to actually start working on eggs. In classes with younger students, I never put matches or lighters on the tables, but only light their candles when they have finished penciling in their designs and are ready to start waxing their eggs.
I set up each individual work space as shown in the photo below:
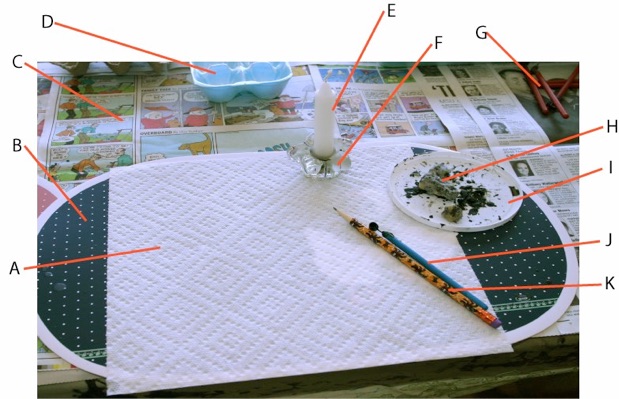
A
B
C
D
E
F
G
H
I
J
K
Paper towel
Placemat
Newspaper
Egg carton (egg holder)
Candle
Candle holder
Traditional styluses (heavy)
Beeswax
Plastic lid/cardboard tray
Traditional stylus (medium)
Pencil
Pencil sharpener
Jar of Goof-off wipes
At each workspace I put a placement (B), and on it a sheet of paper towel (A). The placemat can be any sort, as long as it has a flat surface. It delineates each student’s work area, and helps them keep their materials together, as well as providing a nice surface to work on. I bought a large number of them at a local dollar store (when it was going out of business), but they are available everywhere, and are good value after a holiday. I use inexpensive paper towels (Bounty or Kirkland, as that is what my Costco carries), putting down a single full-sized sheet. The placemat protects the table, and the paper towel provides a clean individual work surface.
(Note: Placemats are optional; you can just place a sheet of paper towel onto the table directly in each space. I like having the placemat because they make clean-up easier and provide an added layer of protection to the table from hot wax and hot metal. The owners of the tables appreciate this. When there are no placemats, I will often place two sheets on top of each other.)
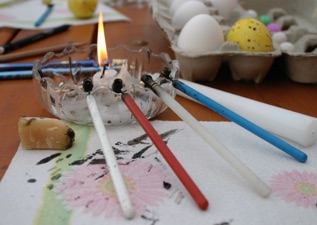
I like to have individual candles when possible; it is simply easier to work if not sharing a candle. If you are using narrow tables, then placing a candle between students on opposite sides of a table will work. Placing them between adjacent students is more difficult, as the one on the right, unless left-handed, will have to be reaching across his work area to reach the candle. I use short tapers (E), either those left after church or small emergency candles like the one above. Long tapers can be used if they are cut in half first. Some teachers use tea lights or votive candles, but I haven’t; I have heard from others that the flame does not burn as hotly, and is much smaller.
If a student is right-handed, the candle should be placed, as above, in the right upper corner of is work space; if left-handed, it should be on the left.
The candle should be placed into a candleholder (F) with a low center of gravity, so as to decrease the risk of tipping over, and to keep the flame in easy reach. I like the sorts of candleholders that have a glass base that extends out; this can provide a place to rest a hot, waxy stylus. When a hot stylus cools, it will stick to whatever surface it was left on, and it is easier to remove it from glass that from paper towel.
Styluses resting on a glass base
Each student, of course, should have a small piece of beeswax (H). Although fresh, new cakes of beeswax are more visually appealing, old ones that have been blackened by use are more useful, as the wax produces nice, dark black lines from the start. I have found, over the years, that some students, especially those using the dip technique, tend to melt their beeswax so much that it adheres to the paper towel and placemat. Rather than spending time trying to pull the paper towel off of the beeswax, I have used small plastic lids (I), but find that these deteriorate after time due to heat, and can be melted/destroyed by young pyromaniacs. I now use paper cupcake forms instead--they are quite inexpensive, and the wax peels off of them fairly easily. They come in packs of 50 to 90 at the dollar store, depending on how blingy you wish to get.

Alternatively, a small piece of cardboard will work, or cardboard tray like the one below:
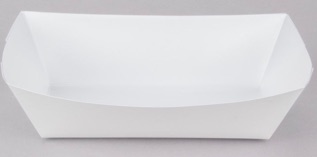
Trays like this are sold in shops in Ukraine for use as snack plates; I have bought a lifetime supply here in the USA from Gordon Food Service.
Each student also gets a pencil (K) and a medium stylus (J) to use. I use number 2 pencils, sharp, and preferably with the eraser removed. I have used harder pencils in the past, and not noticed much of a difference, except that hard pencils are harder to find. The softer number 2 pencil lines seem to come off a bit better with heat based wax removal.
I have accumulated a large number of Delrin styluses (pictured) over the years, and prefer to use these in my classes. I find that the lines are more consistent than with the traditional wooden-handled styluses, as the machined head is less likely to become deformed than a simple copper cone. Also, especially when teaching young boys, I find that the tips of the wooden handles often catch on fire. Besides simply being a fire hazard, burning of wooden handle can loosen the metal tip, making it wobble and write poorly.
Simple egg holder
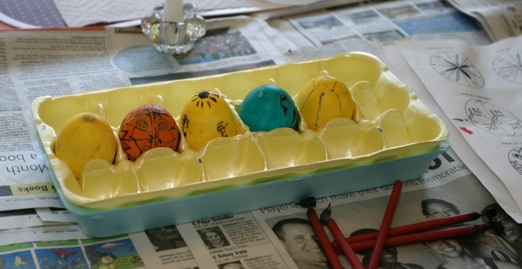
In the center of the table, I place egg holders (D), like the one above, shared styluses (fine and heavy), and pattern sheets. The egg holders are simply egg cartons that have been cut in half, the little tongue flap removed, and then the bottom stacked into the top (to reinforce it). Sometimes students may be working on more than one egg at a time, and sometimes they may need to go for a coffee, tea or potty break; in either case, this provides a safe place to put an egg, where it won’t get knocked around or roll off the table.
Not pictured here, but which I now put on each table, are a small pencil sharpener and a plastic jar in which I’ve placed small pieces of Goo-Off wipes. The latter are useful for removing small amounts of pencil lines (mistakes). Goof Off wipes are n longer commercially available, so some pieces of heavy duty paper towel (e.g. Viva) soaked in some water and dish soap, could probably be used instead. Also useful, if allowing matches to be used (for older students), is a small mini pie tin for discarded matches or other debris.

As for the styluses, I own a lot of medium styluses, and find that these are best for beginning students. I do not own many fine or heavy styluses, though, so these must be shared. Fine lines, I have found, only accentuate wobbles and hesitation, so I don’t hand them out to beginners. I do leave some on the table, as they are useful for writing names and dates on pysanky, and sometimes the more advanced students will want to use them. I always make sure there are heavy styluses on the tables, as these are good for coloring in large areas.
Back to Main Teaching page
Back to Main Pysankarstvo page
Search my site with Google
Comfort, convenience and safety