Lystovky
Листовки
Lystovky
Листовки

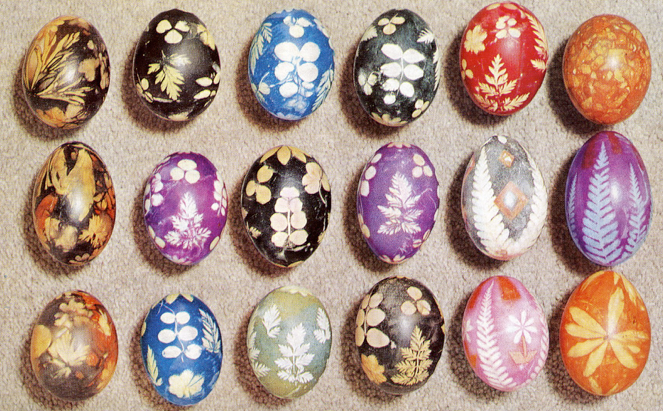
The word “lystovka” (листовка) comes from Ukrainian word lystya/ листя, “leaves.” Lystovky are created by binding small leaves, flowers and greenery to an an egg, and then dyeing it. When the plant material is removed, its outlines remain. These eggs are similar to English “Pace eggs” like those pictured in the photo above (from Venetia Newell’s book).
Lystovky are a variation on the krashanka, and were made to be eaten, so they are made with hard-boiled eggs. In England they were also used in various Pace Egg games and plays.
To make these eggs, you need to gather up small leaves, fronds, ferns and flowers, anything that has a pleasing shape and won’t overwhelm the egg. These bits of spring greenery need to be held in place against the shell of the egg, and the egg dyed.
Different authors give different sets of instructions for doing this. Some suggest a thin paste made of flour to lightly glue the leaves et al to the egg, while others simply place the greens against the shell. In either case, they need to be held up against the shell during the dyeing process by a porous material. More traditional authors will direct you to use strips of cotton sheets; more modern ones use sections of panty hose. In either case, the material needs to bind the greenery tightly against the shell of the egg.
If using natural dyes, which can take a long time to bind to the egg, you may wish to boil the prepared egg in the dye solution. Hot dye binds better than cold dye and gives a more even color, and you can conflate two steps (hard-boiling and dyeing) into one.
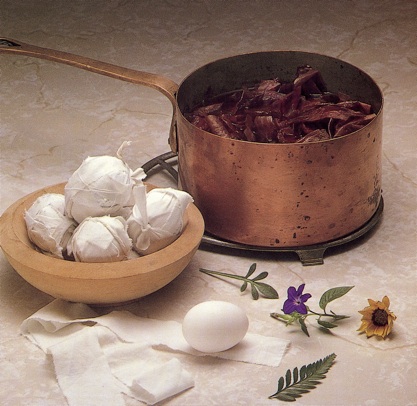
Wrapping lystovky
Onion skins were traditionally used to dye these eggs, and result in a deep terra cotta colored egg. Martha Stewart, on her web site, give instructions and suggestions of some additional natural dyes which use dyestuffs commonly found in American kitchens. While these instructions were intended to be used for making krashanky (traditional dyed Easter eggs), they are suitable for lystovky as well.

Dye Recipes
Select a dyeing agent, and place it in the pot using the amount listed below. Add 1 quart water and 2 tablespoons white vinegar to pot; if more water is necessary to cover ingredients, proportionally increase the amount of vinegar. Bring to a boil, then lower heat. Allow the ingredients to simmer for 30 minutes. Strain dye into a bowl.
Dyestuffs
Red-cabbage dye: 4 cups chopped cabbage
Turmeric dye: 3 tablespoons turmeric
Onion-skin dye: 4 cups onion skins (skins of about 12 onions)
Beet dye: 4 cups chopped beets
Coffee dye: 1 quart strong black coffee (instead of water) Cold-Dipping Method
Colors and Dyeing Techniques
 Deep Gold: Boil eggs in turmeric solution, 30 minutes.
Sienna: Boil eggs in onion-skin solution, 30 minutes.
Dark, Rich Brown: Boil eggs in black coffee, 30 minutes.
Pale Yellow: Soak eggs in room-temperature turmeric solution, 30 minutes.
Orange: Soak eggs in room-temperature onion-skin solution, 30 minutes.
Light Brown: Soak eggs in room-temperature black coffee, 30 minutes.
Light Pink: Soak eggs in room-temperature beet solution, 30 minutes.
Light Blue: Soak eggs in room-temperature cabbage solution, 30 minutes.
Royal Blue: Soak eggs in room-temperature cabbage solution overnight.
Lavender: Soak eggs in room-temperature beet solution, 30 minutes. Follow with room-temperature cabbage solution, 30 seconds.
Chartreuse: Soak eggs in room-temperature turmeric solution, 30 minutes. Follow with room-temperature cabbage solution, 5 seconds.
Salmon: Soak eggs in room-temperature turmeric solution, 30 minutes. Follow with room-temperature onion-skin solution, 30 minutes.
Lystovky can probably be made with ordinary Easter egg dyes (Paas and/or food coloring), although I haven’t tried this. You’d have to dye a few to get an idea of what the dyeing times will be (probably a bit longer due to the layers of fabric wrapping), and be careful handling the eggs, as chemical dyes are very water sensitive. (Natural dyes are generally water resistant, and thus don’t get splotchy from condensation, handling, or if they get damp.)
One the eggs are done dyeing, and cooled off (if they’ve been boiled), remove the wrapping fabric, peel off the vegetable matter, and enjoy your creation. You can rub them with a bit of olive oil to give them a sheen and brighten the color.
If you wish to preserve these eggs, you should probably make them with blown eggs rather than full ones, or use raw eggs and refrain from boiling them, and then empty them afterwards. For some colors, using a “cold” dye rather than boiling means a longer dyeing time; for others, it means you won't be able to achieve the same depth of color.
Lystovky can be varnished in the usual manner, with an oil-based polyurethane varnish. Eggs made with natural dyes, might, theoretically, be able to be dyed with water-based varnishes, although I haven’t tested this theory to see if it works in reality.
The eggs in the photo at the top of the page were made, I am told, with boiled eggs. The eggs dried out over time, as pysanky made with full eggs or pecharky (baked pysanky) usually do. If you decide to go this route, DO NOT varnish the eggs until they have dried out (usually several years) to avoid build-up of gases and possible explosion.
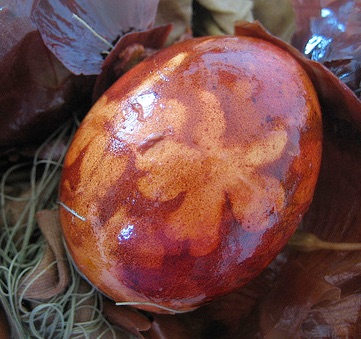
A flower lystovka
Back to MAIN Pysanka home page.
Back to Main Types home page.
Back to Pysanka Index.
Easter Eggs from Nature