Recharging Your Dyes

Aniline dyes, like all dyes, are simply a bunch of dye molecules suspended in water. Eventually, with use, the number of dye molecules decreases, and the dye begins to work poorly: dyeing times get longer, resulting colors are lighter or less intense.
This is the point at which we usually toss out the dye and mix up a new batch. I've always felt it was a waste tossing out dyes when they started to get a bit weak. Yes, dyes are pretty cheap, but the dye solution, even when old and weak, still has a large number of dye molecules left in it. It's just that the concentration has gotten lower, and the cuticle protein-dye molecule binding reaction has slowed down.
Now, I use old, weak jars of black dye to produce a nice walnut brown color. But that's one jar. What to do with all those other jars of weak dye?
I have found that "recharging" them--adding more dye molecules--works quite well. I simply filter the dye, heat it up, add a packet of new dye to it, and then let it cool. Easy-peasy.
STEP 1: EVALUATE your dye. You should first decide if your dye is worth saving at all. If it is foul-smelling, or has a LOT of mold growing in it, don't bother. Throw it out and start over. Make sure you scrub your dye container thoroughly, and give it an additional wash with bleach. Kill those microbes, or they will set up shop in the next jar you prepare, too.
If there's only a small amount of mold, and the dye doesn't smell nasty, you can recharge it instead.
(NOTE: If your dye is full of particulates (sludge), and you think that it has simply precipitated out of solution, try heating the dye up to see if it will redissolve. Microwave for three minutes or so in a microwave safe container. If this does the trick, i.e. the dye redissolves, let it cool down, add vinegar, and then try it out. If it works, you're done.)
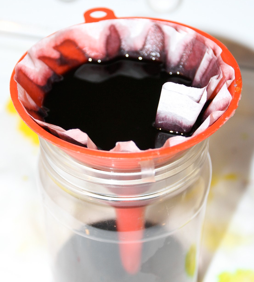
STEP 2A: STRAIN your dye. If the dye is clear, and there is no mold or particles, skip this step. If it lloks dirty, strain it.
You need to separate the good (dye) from the bad (mold, precipitates, loose bits of wax, other contaminants). I do this with a simple plastic funnel and coffee filters (the round, fluted kind). Once the dye has filtered through, remove the funnel/filter. Discard the filter paper, and wash the funnel thoroughly with dish detergent. If there was any mold, bleach the funnel, too.
If your dye container is microwaveable, pour the dye back into it. If not, transfer the dye into one that is.
If there was any mold in the dye, it's worth straining it a second time, rather than just simply pouring the dye back into the original jar (or the one you will be heating the dye in). Repeat as above with filter paper, etc., but place the filter and pour the dye into the jar you will be heating (or original dye jar).
STEP 2B: If you strain the dye, you should also WASH your jar and lid thoroughly. While the dye is straining, thoroughly wash out your dye jar with dish detergent. Remove any old labels. Scrub it clean, and the lid, too. If there was any mold in the jar, use bleach (or a bleach-based spray cleaner) to disinfect the jar. You want to kill any remaining mold/bacteria/spores; if you don’t the problem will recur. Dry the jar.
STEP 3: BOIL the dye. If you are microwaving, MAKE SURE your container is microwaveable. Mason jars are meant for heating, and should be safe; other glass jars may not be and may break or shatter. I use ZipLoc quart jars for most of my dyes, and those microwave easily. For dyes stored in other jars, I pour them into quart plastic soup container when microwaving.
Heat your dye in the microwave long enough to bring it to a boil. I microwave for about 3-4 minutes on “High,” but mine is an old, weak microwave. I leave the jar lid on loosely to avoid splashing.
Alternatively, you can pour the dye into a saucepan and heat it on the stove.
STEP 4: PREPARE the new package of dye. While the dye is heating, find your new packet of dye, and open the outer paper envelope. Remove the dye packet within (foil or plastic), and then trim the envelope down with scissors and write the date on it. This will be your label for the dye jar.
(If using WaxArtSupply dyes, I carefully remove the sticker from the plastic pouch, and use that as my label. It usually peels off quite easily. For my bulk dyes, I've printed up some 1 x 1 5/8 address labels with the name of the dye company; I pencil in the color and date as needed.)
Cut open the dye packet, and prepare it for pouring.
STEP 5: MIX the dye. After the dye has come to a boil, wait a few minutes and then carefully remove it from the microwave. A potholder may be needed. Open the jar, carefully drop in the dye powder, and mix it with a metal spoon. I let it cool down in a safe place, where it won't get knocked over, and with the lid applied loosely.
Vinegar can be added while hot, or when the dye has cooled off. If the dye was not prepared in the jar in which it will be stored, transfer it to that jar once the dye has cooled off.
STEP 6: LABEL your jar! Always label your dyes with the color, brand and date of preparation. It will make life easier later. (To quote Monk, “You’ll thank me later!”) I simply affix the paper packet (trimmed front of it) to the jar with ordinary tape; two pieces, along the top and bottom (or on the sides, if the label is long) suffice. On the jars that I usually use, ZipLoc quart storage containers, I affix the label to the side with metric measurements, so I can still see the cup markings.


Back to Main Dyes page
Back to Main Pysankarstvo page
Search my site with Google
Revitalizing old dyes