Step-by-Step
How to write a pysanka
Step-by-Step
How to write a pysanka

Writing a pysanka
The following photos will help illustrate the creation of a simple pysanka, step-by-step, and will help you learn how to use the pysanka patterns provided on my site and on others. We are going to make this pysanka:
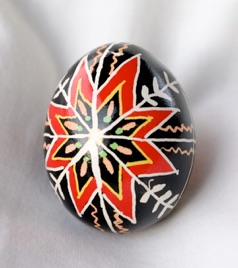
This is the pattern we will be using (it can be found on my downloads page):
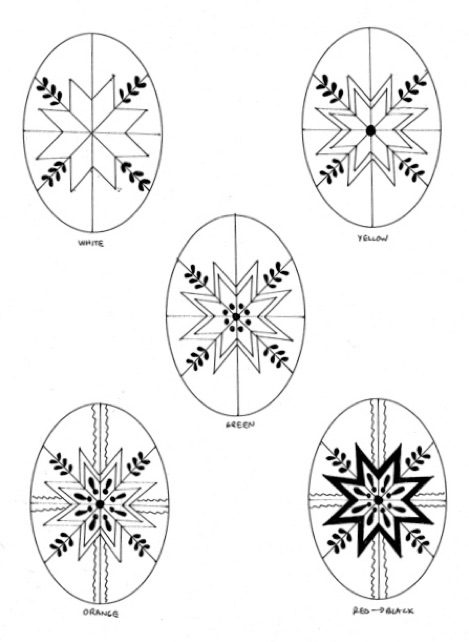
When considering a pattern, first we have to consider 1) the complexity and 2) if we have the colors necessary. The pattern is a fairly simple one, and the colors are the very basic ones, which we have, so we are ready to start.
Next we have to determine how to divide the egg. This pysanka requires a division into eighths: one line around the equator, and two longitudinal divisions. There is also a double star, so we will need to divide each eighth as shown:
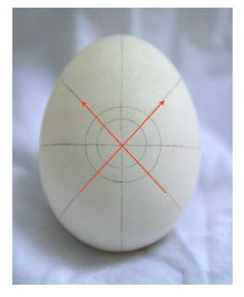
The red arrows shows the division of each of the eighths in half, to help with the drawing and placement of the star.
I’ve also drawn a double circle into the center. Why? To help me draw these nesting stars.
Next, using this framework, we sketch in the outer star:
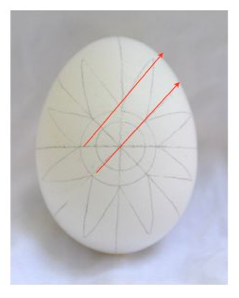
Note that the sides of the points of the star are parallel to the line opposite (red arrows). You can sketch in the inner star if you wish, but it really isn’t necessary–you can draw it with wax later by following the outline of the outer star.
(For more on drawing stars, go here.)
Now that the basic outline has been pencilled in, we can begin applying wax to the egg. We begin by drawing in the dividing lines, and then by adding the star and outlining the leaves. This should all be done with a medium stylus:
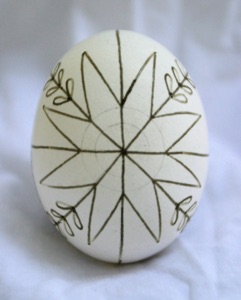
When writing with the stylus, use long, broad strokes. Short strokes will look scratchy and make your lines look wobbly.
Next we need to fill in the leaves. This can be done with a medium stylus, but is much easier with a large/wide point stylus.
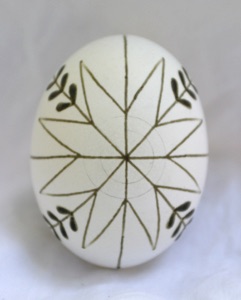
Remember to cover thoroughly with wax, because missed areas will show up as black spots later.
Having waxed in all the areas on the pattern marked white, we can now dye the egg. First, though, it should spend a few minutes in the vinegar rinse (a solution of about 2T vinegar to 1 cup water). I normally leave it in until I see bubbles begin to form on the surface of the egg. Don’t forget and leave the egg in too long–the acid can destroy the protein coat of the egg and thereby ruin your pysanka.
Move the egg directly from the vinegar rinse to the yellow dye (as per our pattern), and leave it in several minutes. Yellow is your base coat, and you need to make sure the dye has ample opportunity to set. After three minutes or so you can take it out, and gently pat it dry. It should look like this:
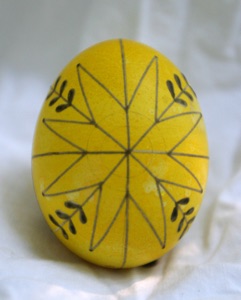
Don’t worry–everything under the wax is protected, and has remained white. Now it is time to apply more wax.
And you can now understand why we use beeswax–it turns black when heated in the candle, so that your lines really stand out!
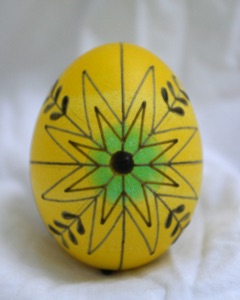
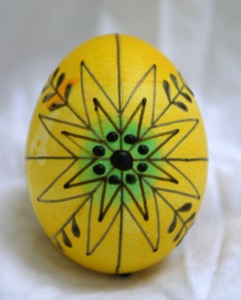
Looking at the pattern, we figure out what we have to do next by looking for differences between the white egg and the yellow egg next to it. What differences do you see? There are two–the second star, and a big dot in the middle of the star. So, once the egg is well dried (a few minutes and not damp or cold to the touch) we apply the wax:
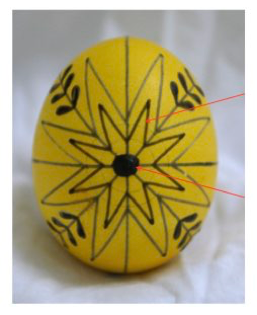
Inner star
Big dot
All is going well so far. The next color in our pattern is green. There are two ways to approach this. One is to dye the entire egg green, and then apply the wax; the next color, orange, will remove the green. On this particular pysanka, though, there is only a tiny area of green, so we can apply the dye with a Q-tip (cotton-tipped applicator), let it dry, and then wax.
Applying the dye will give us this egg:
Why do we do this? Because putting the green egg in orange dye will muddy the orange dye, even if the green is successfully removed.
People who make lots of pysanky will keep an extra jar of orange dye around for this purpose, usually an older jar, and label it “orange rinse.”
Next we compare the yellow and green patterns above, and determine that we need to make a bunch of dots in green.
Once again we will need the heavy stylus; it makes much nicer, rounder dots than the fine or medium.
Dots
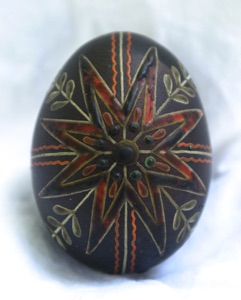
We put the egg into the orange dye, and this is what results:
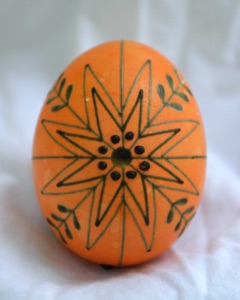
Notice how nicely the green has been removed! Orange is the only color that will do this, largely because it is made without vinegar. A vinegar-based orange/pumpkin will not remove darker colors, and another method would need to be used.
Once again we return to the pattern and try to find the differences between the two pictures, much like the puzzles we used to do as children. We then write in the new design elements:
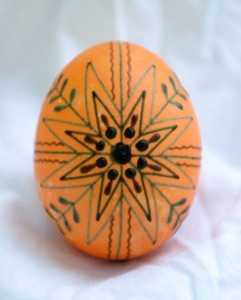
Did you find the differences? A teardrop and a squiggly line have now been added:
tear drop
squiggly line
We now dye the egg a bright red (or scarlet in UGS dyes). This should be a very brief dip, as the bright red takes quickly, and leaving it in too long can cause a odd residue to form which seems to glitter. It should take no more than a minute, two at the longest, to get this egg:
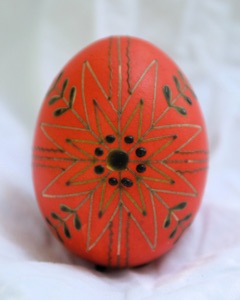
The black of the beeswax really stands out against the red background!
Red will be our last color to wax. Look at the pattern, and find the differences between orange and red. Did you find them?
There is only one thing to do here, fill in the outer star. This appears to be a simple task, but it is all to easy to miss spots when waxing and have “scratches” and “spots” show up in your supposedly solid colored areas.
To avoid this problem:
1) Use a heavy stylus to fill
2) Fill methodically
3) Check carefully, under a good light and with
magnification, if necessary, before dyeing the egg
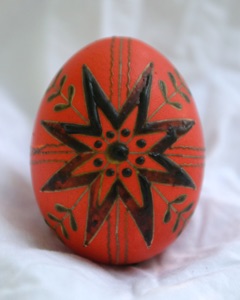
If the star looks well filled in, dye your egg black.
Leave the egg in the black dye a bit longer than the other dyes. This is your final color, so you want a nice, dark, rich coat. Luckily, black dye is very forgiving, and will often take well even on eggs that have odd light spots, roller marks, or didn’t take the other colors well. You might want to change the position of your pysanka in the dye at least once while dyeing, so you don’t get a light spot where the eggs rests against the bottom or side of the jar.
When it is done, your egg will look a bit like this:
A waxed egg is a bit like the ugly duckling....
Now comes the magical part. Once the egg has dried well (give it several minutes), hold the egg gently next to the candle flame, but not over or too close to, or you will scorch and get soot all over the egg. Let the wax melt a bit. Wipe it off with a tissue or a bit of paper towel. Keep repeating until you have removed all the wax.
Once the wax is off, the beautiful pysanka underneath will be revealed:
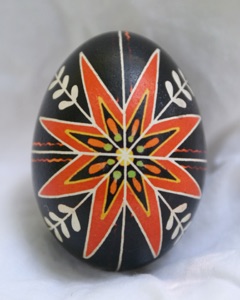
Congratulations! Your first pysanka!
(Note: due to technical difficulties, some of the wax on the pysanka above came off during dyeing, and the orange squiggles disappeared in some areas. Stuff happens!)
Back to Main Basics page
Back to Main Pysankarstvo page.
Back to MAIN Pysanka home page.
Search my site with Google


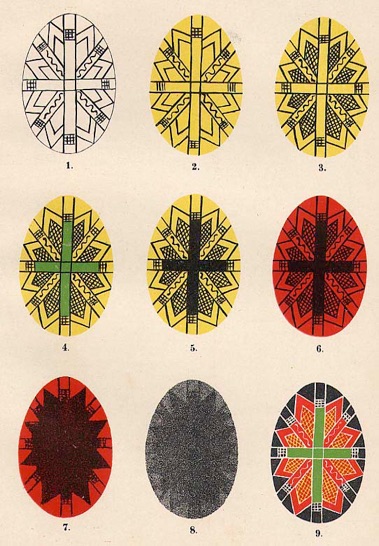
Pysanka writing diagram from V. Shukhevych’s
ethnographic monograph “Hutsulshchyna” (1902)